Recently, we made the logistic map fractal visualizer app, but, how do we keep USER ENGAGEMENT METRICS up? Gotta make a twitter bot to post fractals, that’s how!
I found it somewhat tricky to get this working, because there is a lot of odd lingo out there. There are libraries that may help you, but this post goes through making an OAuth client in node.js to post to the twitter API with fairly unabstracted code. OAuth still confuses me, but if you follow these steps, you can make a bot!
Step 1
Get your keys. I forget the exact procedure for this but go to https://developer.twitter.com and sign up, register an “app” with them, and poke around for a while. This github repo provides a couple more details about the process of registering https://github.com/manzt/cron-tweet#create-a-standalone-app-in-the-developer-portal
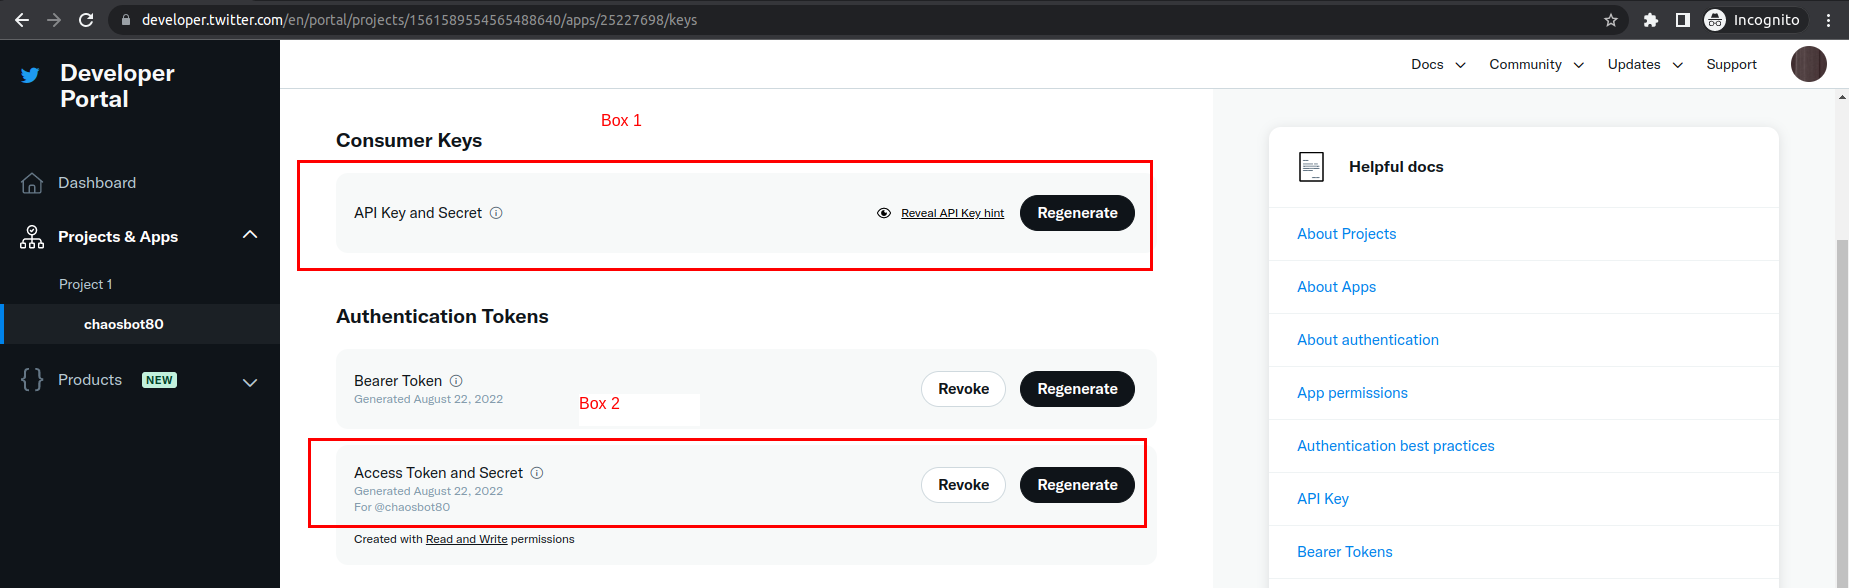
After some time, you should get a screen that looks like this. Keep this around for Step 4. Note: I did not have to apply for any elevated access for this article, just the basic level you get from the initial registration! I believe in twitter terms, this article only requires “Essential” access and not any “Elevated” access.
Step 2
Make a repo with a couple dependencies
mkdir mybot
cd mybot
yarn init
yarn add node-fetch formdata-node oauth dotenv typescript
Step 3
Update package.json with a couple scripts to build these typescript files
(alternatively use ts-node or similar to run the ts files directly)
{
"dependencies" : {
"dotenv" : "^16.0.1" ,
"formdata-node" : "^4.4.1" ,
"node-fetch" : "^3.2.10" ,
"oauth" : "^0.10.0" ,
"typescript" : "^4.7.4"
},
"license" : "MIT" ,
"type" : "module" ,
"devDependencies" : {
"@types/node" : "^18.7.9" ,
"@types/oauth" : "^0.9.1"
},
"scripts" : {
"build" : "tsc" ,
"prepost" : "yarn build" ,
"post" : "node dist/bot.js"
}
}
And tsconfig.json file
{
"include" : ["src" ],
"compilerOptions" : {
"target" : "esnext" ,
"outDir" : "dist" ,
"moduleResolution" : "node" ,
"declaration" : true ,
"strict" : true ,
"esModuleInterop" : true
}
}
This compiles the src folder and outputs js files to the dist directory, and
we can run node dist/bot.js to post the tweet
Step 4
Create a .env file with your keys that you found in the above screenshot corresponding to box 1 (which gives you API_KEY/API_SECRET, sometimes also referred to as consumer keys in other documents) and box 2 (which gives you ACCESS_TOKEN and ACCESS_TOKEN_SECRET)
API_KEY="xxxxxxxxxxxxxxxxxxxxxxxxx"
API_SECRET="yyyyyyyyyyyyyyyyyyyyyyyyyyyyyyyyyyyyyyyyyyyyyyyyyy"
ACCESS_TOKEN="aaaaaaaaaaaaaaaaaaa-aaaaaaaaaaaaaaaaaaaaaaaaaaaaaa"
ACCESS_TOKEN_SECRET="bbbbbbbbbbbbbbbbbbbbbbbbbbbbbbbbbbbbbbbbbbbbb"
Important: Also add the .env to your .gitignore, you don’t want to commit this to github!
Step 5
Make the bot! Create src/bot.ts
import fs from 'fs'
import * as dotenv from 'dotenv'
import OAuth from 'oauth'
import fetch , { RequestInit } from 'node-fetch'
import { FormData , File } from 'formdata-node'
dotenv . config ()
async function mfetch ( url : string , params : RequestInit ) {
const response = await fetch ( url , params )
if ( ! response . ok ) {
const text = await response . text ()
throw new Error ( `HTTP ${ response . status } ${ text } ` )
}
return response . json () as Promise < Record < string , unknown >>
}
function getAuthHeader ( oauth : OAuth . OAuth , url : string ) {
return oauth . authHeader (
url ,
process . env . ACCESS_TOKEN as string ,
process . env . ACCESS_TOKEN_SECRET as string ,
'post' ,
)
}
;( async () => {
try {
const client = new OAuth . OAuth (
'https://api.twitter.com/oauth/request_token' ,
'https://api.twitter.com/oauth/access_token' ,
process . env . API_KEY as string ,
process . env . API_SECRET as string ,
'1.0A' ,
null ,
'HMAC-SHA1' ,
)
const picEndpoint = 'https://upload.twitter.com/1.1/media/upload.json'
const tweetEndpoint = 'https://api.twitter.com/2/tweets'
const clientName = 'v3CreateTweetJS'
const form = new FormData ()
form . set (
'media' ,
new File ([ fs . readFileSync ( 'yourpicture.png' )], 'yourpicture.png' ),
)
// first post a picture
const response1 = await mfetch ( picEndpoint , {
headers : {
Authorization : getAuthHeader ( client , picEndpoint ),
'user-agent' : clientName ,
},
method : 'POST' ,
//@ts-ignore
body : form ,
})
// then post a tweet, referring to the media_id_string from response1
const response2 = await mfetch ( tweetEndpoint , {
headers : {
Authorization : getAuthHeader ( client , tweetEndpoint ),
'user-agent' : clientName ,
'content-type' : 'application/json' ,
accept : 'application/json' ,
},
body : JSON . stringify ({
media : { media_ids : [ response1 . media_id_string ] },
text : 'Hello world!' ,
}),
method : 'post' ,
})
console . log ( response2 )
} catch ( e ) {
console . error ( e )
process . exit ( 1 )
}
})()
Step 6
Now that you have the bot, you can run it locally with yarn post (runs the
“post” script in package.json) to test it out
Step 7
Now to create a github action to run the bot.
Navigate to your repo’s settings page, then go to Secrets->Actions and paste the keys one by one, see below screenshot

Step 8
Create a file with the path .github/workflows/post.yml in your repo to make
the post
You can use a cron/scheduled workflow in the github action, which the below example does https://docs.github.com/en/actions/using-workflows/events-that-trigger-workflows#schedule
The below github action posts every 5 hours on the hour (see https://crontab.guru/ for more info on cron syntax)
name : Post tweet
on :
schedule :
- cron : '0 */5 * * *'
jobs :
test :
name : Post tweet
runs-on : ubuntu-latest
steps :
- uses : actions/checkout@v2
- name : Use Node.js 14.x
uses : actions/setup-node@v2
with :
node-version : '14'
- name : Install deps (with cache)
uses : bahmutov/npm-install@v1
- name : Post tweet
env :
API_KEY : ${{ secrets.API_KEY }}
API_SECRET : ${{ secrets.API_SECRET }}
ACCESS_TOKEN : ${{ secrets.ACCESS_TOKEN }}
ACCESS_TOKEN_SECRET : ${{ secrets.ACCESS_TOKEN_SECRET }}
run : yarn post
Conclusion
See https://github.com/cmdcolin/twitter_fractal_bot for working example. I could
have, in retrospect, used a library like twit
(https://www.npmjs.com/package/twit) but this code sample is not substantially
more complicated than using the twit library.
You can also adapt this to post only when you push to your repo, or release a new version from your repo!
Footnote 1: Examples of odd lingo or stumbling blocks you might come across
- Bearer token - The Bearer token is an alternative method of authenticating, but it cannot be used to post tweets
- Twitter API v1 vs v2 - We use a mix of v1 and v2, it’s just the different URLs that we are posting to and can be mixed in our example
- Consumer key vs API key - they are the same thing in our example. If you look closely at the box 1 in the screenshot it says “Consumer keys” and then gives you an API key below *
Footnote 2: Posting on release with a github action
Replace the cron section of the github action with
on: release